Wednesday, November 20, 2013

Road Crew Ready                   

 Roads go in next.  We chose cobblestone for one section and brick for the rest.  The Lemax roads are easier to get at Michael's so we mostly use their road material.  We have some problems reusing the roads from year to year because of the color variations.  We can't put the more brown roads next to the more red roads.  Currently we have about 4 or 5 variations of the brick color.

Cobblestone area

Entertainment area

Town Square.  Will be adding a large lit Christmas tree.

Lighting the Houses                  

We use a lot of multiple light strings that helped eliminate quite a few plugs.  We have them in 2, 3, 6 and 20 light strings.  Wiring 20 houses with a single strand is GREAT when you have nearly 100 houses to light.

Various light strings and the large transformers that can light either houses or accessories such as street lights. This does not include the individual transformers for some of the buildings.
Some of the wiring.  Don't worry to much about all the wires just yet.  Trees are our friend when it comes to hiding the wiring.


Wires crossing the street before hiding them.

Some of the wiring will need to cross streets so you can push the cords into the styrofoam and if you have one of the switches or lots of wires crossing in one place just cut out a trough and use white masking tape to hold the wires in place and to cover them up.  Roads will be going over these sections.

Main Power Setup                     

To light the town we use various methods and new versus older wiring systems.  There will be many transformers, small power strips and adapters for multiple plugs.  Notice the hole in the table to go from underneath the table to the display.
We start with 2 of these power strips under the table that plug into 2 different wall outlets.

The wall outlets are these X10 controllers (original ones were Radio Shack, plug into existing outlets or replace the outlet) for all the Christmas decorations around the house.  These allow me to turn on and off selected displays (living room tree, Dept 56 Snow Village, Dept 56 Christmas in the City, garland over the fireplace, etc) or all on or off at one time.  GREAT at bedtime!!


Tuesday, November 19, 2013

Layout of the City           


Laying out the city in a realistic way is challenging.  Clusters of buildings, alley ways to show off the backs of as well as the front of buildings.  Being sure we can hide the lights that stick out the back of many of the older buildings.  Showing off large iconic buildings such as the Chrysler or Flatiron Buildings.  Making sure there are neighborhoods with shops for people to live in and don't forget to make all visible sides look good. We have ours backed up to some french doors so we have houses facing the doors so the village also looks good from outside.  We have an entertainment area, town squares, an ice skating area and of course leave enough room for big city Christmas trees, etc. etc...

We really love the flat iron building.

This section will be visible from outside through the french doors when we push the table back.
We plan to add a huge city Christmas tree in this square.


Saturday, November 2, 2013

Houses Out of Storage            


This is what 98 buildings look like.  When we moved from Virginia to Florida we lost our basement and had to find storage in the house.  High ceilings in the closets are a godsend.


98 Christmas in the City Houses, a Few Big Trees and an HO Train

This was all in that closet.

Monday, October 28, 2013

Laying Out Styrofoam.                 

Since we have used this basic setup before I could just lay out the styrofoam again to match the shape of the table.  We use florist pins to hold the individual pieces tightly together.  2 or 3 on the short sides and 3 to 5 on the longs sides.  For the base that is 1 inch thick I cut the florist pins to just less than an inch so they go all the way in.  For the 2 inch thick styrofoam we use the full size pins that are about 1 3/4 inches long. Don't worry to much if there are dents and old cuts for old wiring to much.  I just make sure that the outer edges are crisp and undamaged.  The rest will be mostly covered with houses, streets, trees and snow.

Last year we put in an HO scale train and the right side covered about 1/3 of the track allowing for houses over the track that would not have been possible if the entire track was exposed.  We decided not to incorporate the train this year because we had bought some new houses and were not confident we could get them all in without compromising on design.

Base Layer

Upper Layer Right

Upper Layer Left

Uncut & Cut Florist Pins

Sunday, October 27, 2013

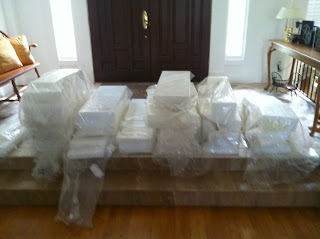
Staging Styrofoam.          

Now that the table is built we will start to lay the base.  Here is all the styrofoam that forms the base.  It is fairly expensive for this size setup but it can be reused year after year.  We use the 1 inch thick 12 X 36 inch sheets.  We do not advise cutting corners by using the cheep styrofoam used for shipping and packing. We tried it some but we had trouble cutting it and making it look finished.  It also made a huge mess with all the styrofoam balls that came off while cutting.  When we need more support because we are building a second level we use the 2 inch thick sheets.
Styrofoam ready to be laid.